Projects

Fall Craft Roundup

ProjectsElizabeth Ramos

We love this time of year, and while everyone is starting to get busy preparing for Christmas, let's not bypass the beautiful season that we're in right now. In honor of the changing leaves and cooler weather, we gathered a few of our favorite Fall DIYs to inspire and prepare you for a season of making. Follow the links below for tutorials on each of the projects pictured.

FallDIYs

Clockwise from top left:

1. Pie Inspiration 2. Keep your houseplants cozy 3. Pumpkin Guest Book — ask family members to write what they're thankful for 4. Pinecone Placecards – these would look great in gold too! 5. Repurposed sweater basket 6. Gold-dipped glasses

Next Event: Bookbinding

Craft News, Events, General Info, ProjectsElizabeth Ramos

Our next event is coming up very soon, and if you've ever wanted to learn more about bookbinding, this is your chance! Cindy Leaders, an Indie Craft Parade alumnus and talented bookmaker will teach us how to create books using reclaimed materials. And what better place to learn about making books than at the library?

Join us at the Downtown Hughes Main Library in Greenville and learn how to make Buttonhole Pocket Books, a simple bookbinding technique that is easy to recreate at home. These little books would be perfect for sketching, journaling or even giving as a gift.

Cindy Leaders, with some of her Useful Books.

Students should bring a pair of needle nosed pliers (curved are preferable). Additional materials and tools will be provided to make three 3” x 4” books. All skill levels are welcome.

When: Saturday, May 3, 2014 from 2 PM – 4 PM Where: Hughes Main Library, 25 Heritage Green Place, Greenville, SC 29601 Cost: $22

Reserve your spot now!

DIY Tea Towel project

Projects, Tips & TricksElizabeth Ramos

Since meeting Rachel Faucett of Handmade Charlotte at The Makers Summit, we're completely amazed by the depth of her both her blog and her product design. She's partnered with top crafting companies to create one of a kind crafting supplies that are unique as well as easy and fun to use.

Today, we're excited to show you what we did with one of these products — adhesive stencils. We had so much fun making some custom tea towels with her stencils, and we wanted to share this fun tutorial with you. Here's a peek at the simple supplies you need. You can find the full tutorial on Kollabora.

Valentine Inspired DIY Roundup

Projects, Tips & TricksElizabeth Ramos

Have you heard about Kollabora? They're an online community for makers, and we've been loving the wealth of DIY projects to be found there. In fact, we started our own page where you can easily find past Indie Craft Parade DIYs. We've rounded up just a few Kollabora projects that are inspiring us for Valentine's Day this weekend. If you're feeling crafty or just need some extra beauty in your life, these projects will get you started. Find a link to each at the bottom of this post.

ValentineRoundup

DIY Stamp Set

ProjectsElizabeth Ramos

I've got a great tutorial for you to try this weekend! As you know, last Saturday we spent the day at the Greenville Children's Museum teaching kids how to make their own stamps. Turns out, it is the most fun craft ever! We've been making them non stop--and stamping everything paper in sight.

So we want to share this super easy yet very rewarding tutorial. And I promise, once you get started, you can't stop yourself.

Processed with VSCOcam with g3 preset

Supplies:

-Adhesive backed foam sheets -2 inch by 1/4 inch wood squares -Scissors -Pen -Ink pads -Paper (wrapping paper, notebook, gift bags, etc.)

1) Cut a piece of foam roughly the size of the woodblock. 2) Draw the shape of your stamp on the foam. Don't forget, your stamped image will be backwards, so draw your shape the opposite of how you want it to stamp.

3) Cut along your drawing.

4) Peel off the paper to show the glue on the back of the block.

5) Place the glue side of the foam on the block, and press to adhere.

Processed with VSCOcam with g3 preset

Here are some of the shapes we've made. The possibilities are endless!

Processed with VSCOcam with g3 preset

After that, just place the stamp face down into the stamp ink pad. Press all around to distribute the ink evenly.

THEN STAMP AWAY!!

Try your hand at making these stamps. Then show us what you make! Put them on our Facebook page or tag us on Instagram!

Workshop: Paper Ornaments with Mollie Greene

Events, ProjectsElizabeth Ramos

We're so excited for our upcoming crafting class with the amazing Mollie Greene of Royal Buffet and Sweet Paper Crafts. Mollie's fanciful paper lovelies never fail to delight, and now she's going to show you how to create wonderful ornaments for holiday gift giving, tree decorating, or present topping. All the supplies will be provided (vintage papers! glass glitter! and more!), just bring your own pair of scissors. Mollie has nearly 20 different ornament styles ready for you to create, see how many you can make!

WHAT: Paper Ornaments WHEN: Thursday, November 14 from 7 – 10 pm WHERE: Cowork, 1040 W. Washington Street, Greenville SC 29601 COST: $25 REGISTER HERE

DETAILS:Come for a fun evening of handcrafting original paper ornaments using vintage and antique papers, German glass glitter, tinsel, crepe paper, string, and more. Each participant will leave with the ornaments they create throughout the evening, and their own set of templates to take home for more holiday paper merrymaking.  All paper finery and other supplies will be provided, but we suggest bringing your own sharp scissors along with you. Mollie will be guiding you through the ornament making process as well as offering paper crafting tips and tricks along the way.

Here's a little peek at just a few of the ornament styles you'll learn to make:

These paper ornaments are so much fun to make and even more fun to give. They make the perfect gift for teachers too!

You don't want to miss this crafty evening with Mollie, it's going to be swell. Grab your friends and register here!

It's time to make stuff!

Events, ProjectsElizabeth Ramos

Our first few workshops have been a fabulous success! Here's what's coming up next...

Paper Ornamentswith Mollie Greene of Royal BuffetThursday, November 14 from 7 - 10 pm

Winter Wreathwith Julie Dodds of Willow FloralsTuesday, December 3 from 7 - 10 pm

Learn to Knit with Deb Potter of Merciful Hearts FarmThursday, February 6, 2014 from 7 - 10 pm

iPhone Photographywith Jivan Dave March 2014, more details to come

Succulent Terrariumwith Amy Walchers of Urban Digs Tuesday, April 8, 2014 from 7 - 10 pm

Bookbindingwith Cindy Leaders of Useful Books May 2014, more details to come

Homebrewing 101with Ben Alier and Grape and GrainsJuly 2014, more details to come

These classes fill up quickly, so register before it's too late!

New Giveaway! Paper Wreath Kit

ProjectsElizabeth Ramos

You know we love to get people crafting, so why don't you spend part of your weekend working on an awesome project like this paper wreath we're featuring today. You can either make your own from scratch using our instructions, or you could be the lucky person who wins a craft kit all your very own. All you have to do is comment at the end of the post. You'll be automatically entered in a drawing for the craft kit. Here's another project from The Best Craft Party Ever: Paper Wreaths. The coolest thing about this project is it's inspired by crafty maven Mollie Green. This is one of the wreaths she included in her awesome book, Sweet Paper Crafts, published by Chronicle books, releasing in June 2013 (available for pre-order now).

Supplies: · various papers · pencil · scissors · templates · glue stick · glitter (optional) · glue dots · wreath form

The following instructions are specific to the butterfly cutout, but the same instructions apply to any of the templates.

1. Trace templates onto paper.

2. Stack two papers together and cut out the butterflies, keeping each butterfly pair together. Depending on the size of your templates, you will need anywhere from 12-20 butterfly pairs.

3. (Optional step) When you’ve cut out your pairs, apply glitter to the wings of one of the butterflies in the pair.

Pour the included glitter onto one of your large scrap pieces of paper.

Using a glue stick, rub a small amount of glue around the perimeter of the wings.

Gently press the glued portion of the wing into the glitter and tap off the excess. Repeat this step for as many or as few of the butterfly pairs as you like.

4. Adhere the butterfly pairs to the provided wire wreath form: Take a pair of butterflies and apply 3 or 4 glue dots to the body (not the wings) of one butterfly and place it under the wire form, pressing to adhere.

Take the other butterfly body and attach it to the wire directly above the first butterfly, lining up the bodies and the wings.

**NOTE: The glue dots have a double sided adhesive, so the easiest way to transfer them to the butterfly is to take a single dot (with the backing still on) and press the exposed sticky side into the paper. Once secure, peel the backing away, and the glue dot should remain on the butterfly.

5. Continue gluing butterflies to your wreath until you are satisfied with the arrangement. You can go for a full look, or an open, airy feel.

6. Once you’ve finished, bend open the wings of each butterfly for a fuller, more fluttery wreath.

PFor the templates to Mollie's wreaths, check these out: Paper Wreath Templates.

And don't forget to comment below for a chance to win a kit!

Craft Kit tutorial and Giveaway, Part 2

ProjectsElizabeth Ramos

Happy Valentine's Day Everyone! Hope it's a very special day. To celebrate, we're giving away our 2nd of 4 craft kits that were featured at the recent Greatest Craft Party Ever---Today, Handmade Beeswax candles. This craft is quite fun and rather easy. Here are the steps. Don't forget, if you would like to win your very own kit, simply leave a comment below.

Supplies: · 4 8x8 sheets of beeswax · 3 yards of candle wick · scissors –provided by Dritz · small knife · cardboard cutting mat · velvet ribbon · muslin bag

Notes: The instructions are for making a set of 8 taper candles, but feel free to experiment. You can make a large pillar candle, a set of small birthday candles, or any assortment of sizes you like!

1. Take one sheet of 8x8 beeswax, and place it on the cutting mat. Cut it in half, so you have two 4x8 pieces (or cut into any size you’d like for custom candles).

2. Lay the cut piece of beeswax onto your table surface. Unroll a length of wick, and cut a section 1 inch longer than your candle height. (lay it on top of the beeswax to measure, you want it hanging off the top about an inch but flush with the botton edge).

3. With your wick lined up along the 8 inch side of beewax, begin rolling it up. Try to keep it rolled as tight as you can, especially the center with the wick. Roll it into a cylinder form gently. If the wax starts to crack just push it back together and keep rolling.

3. (continued) At the end, gently push and pinch the seam into the candle to seal. If the bottom of the candle is uneven, trim it on the cutting mat.

4. Repeat until you have finished making all your candles!

5. To package up pretty, place candles into a bundle and tie up with velvet ribbon. Slip the bundle into the muslin bag, perfect for safekeeping or gift giving.

6. Before burning, trim the wick. The wax is a little sticky so you can use a glass dish as a candle holder by pressing the candle into the bottom dish and making in stick in place.

S0 simple, so fun! Leave a comment below and win your own kit!

PLEASE NOTE! The craft boxes are available to people within driving distance of Greenville, South Carolina who are willing to pick them up in person. The craft kits are NOT available for shipping.

Craft Kit tutorial and Giveaway, Part 1

ProjectsElizabeth Ramos

We hope you've been checking out all of the pictures of The Makers Summit and The Best Craft Party Ever on various blogs, Facebook, and particularly Instagram under the tag #makerssummit. They're really awesome. If you have been looking, I'm sure you've noticed all of the crafty goodness that took place at the party. Over 100 people spent the evening trying their luck with a new handmade skill. And now...YOU CAN TOO!

Photo courtesy of Paige Maitland

For the next four Tuesdays, we will be sharing tutorials for the crafts made at The Best Craft Party Ever, and one lucky person will actually win a complete craft kit. With the kits, you can make either a terrarium, a leather notebook, a paper wreath, or beeswax candles from start to finish---no need to buy supplies. At the bottom of the post, simply leave a comment, and on Friday we'll choose a winner at random from the selection.

PLEASE NOTE! The craft boxes are available to people within driving distance of Greenville, South Carolina who are willing to pick them up in person. The craft kits are NOT available for shipping.

Today, we'll be sharing the tutorial for our most popular craft kit from the party, the moss terrarium--complete with little houses from Crave Studio.

Supplies: · glass jar with lid · dirt · stones · preserved moss · lichen and twigs · ceramic houses (handmade at Crave Studio) but you could make your own out of polymer clay · plastic gloves for keeping clean · wooden stick to help move & position

Note: The instructions here are just suggestions. Feel free to experiment and create your terrarium any way you’d like!

1. If you’d like to keep your hands clean, put on the plastic gloves.

Terrarium Instructions.indd

2. Begin by layering rocks and dirt in the glass jar. You can tilt it sideways to layer at an angle, or build it flat. Mound up some little hills of dirt to create an interesting landscape.

Terrarium-PHOTO-2

3. Cover the surface with mounds of moss. Try varying sizes and textures. Don’t build your terrarium too high, it’ll look better with some headroom. 1/2 - 2/3 full should be just right.

Terrarium-PHOTO-3

4. Add in twigs and bits of lichen. You can use the wooden stick to help adjust and position.

Terrarium-PHOTO-4

5. When you’re satisfied with your terrarium world, add in the ceramic houses (made by Crave Studio), pressing the wire legs into the moss to secure. Put the lid in place, and you’re all done!

Terrarium-PHOTO-5

Caring for your terrarium: Because your terrarium is made with preserved moss, it needs virtually no care! It doesn’t need water or sunlight, just love.

Now, how easy was that? Just a few supplies, and you'll have a beautiful creation. But, go ahead and take a chance on the giveaway. For just a comment, this could all be yours.

See you soon with the winner!

Guest Tutorial by Shop-Keep (part 2)

Artist Showcase, ProjectsElizabeth Ramos

Welcome back to the upholstery tutorial from our friends at Shop-Keep!  Last time Mandy Blankenship shared the beginning of her long but rewarding journey to recovering her lovely chevron chair. If you missed part one of the story, please check it out here.

Now to continue...

7) Sewing and Stapling

All your hard work laying out fabric, thinking about which direction the motif should run, and planning how the seams will meet pays off when you begin sewing the pattern pieces together. I began by sewing the decking to the lip fabric, an odd rectangle piece of chevron that has mitered corners. Decking fabric is usually not the same as your pattern fabric but of a similar weight, so choose wisely. Once I joined the grey decking fabric to the lip, I returned to my chair frame to staple them in place. Staple the bottom of the lip to the front bottom of the chair, starting in the center and evenly distributing your fabric over the batting to the right and left, a little bit at a time. Staples should be a couple inches apart–not super close, but not really far apart. When stapling fabric, don't stretch it too tightly, or it will weaken and possibly tear. Finesse it, be gentle but firm. The fabric will go where you tell it to, but don't be harsh with it.

Sewing-&-Stapling-the-Lip-&-Decking_SM

After stapling the fabric to the bottom of the lip, pull the top of the decking fabric underneath the chair back and staple to the chair base, starting at the middle and working your way to either side. Next reach the sides of decking fabric underneath arms and staple them to sides of the chair base. You may need to cut slits near the base of chair arms so that the fabric stays smooth and doesn't fold awkwardly. Use a curved needle and upholstery thread to anchor the decking to the springs below, near where decking fabric is sewn to patterned fabric.

Now it's time to sew the welting. Join 1 1/2 inch wide strips to one another to form one really long strip of fabric the same way you would make bias tape (but ignoring all the double-folding). Then wrap the strip of fabric evenly around cording, place under cording foot on the sewing machine, and sew in place. The cording foot on the industrial machine is so dreamy to use.

Sewing-&-Stapling-Welting_SM

To make the arm covers for the Chevron Chair, I placed the welting on top of the center top strip of arm fabric with all the raw edges facing the same direction, then pinned it in place. After pinning, I basted the welting in place to keep it from moving around during sewing. If you omit basting, you MUST remove each needle before it goes under the sewing machine foot. I have broken way too many sewing machine needles by not doing this. Basting the welting in place is really the best method, looks the most tailored, and is how all the couturiers make garments of old. Sew welting to arm top fabric, then sandwich the welting in between the right side of the next piece of arm fabric to be attached, pin and baste; then sew from the side you haven't sewn on yet (this ensures the welting will be evenly placed between layers). Fit arm fabric over chair arms, remembering to smooth the batting. Staple inside arm fabric on top of where you placed the sides of the decking fabric. Before I stapled the outside arms in place, I made sure to place dust cover fabric over the outside arms in order to have a surface on which to place outside arm batting. Staple both in place, fluff batting, then cover with outside arm fabric.

Stapling-Welting-Onto-Chair-Back_SM

I used cardboard tacking strip to give a nice, sharp edge to the welting and arm fabric that reaches down the side of the chair frame past where the arm ends. Sneak cardboard tacking strip underneath the arm fabric, and carefully staple in place. Staple outside arm fabric underneath chair frame at the sides. Lastly, staple the back of the arm covers to the back of the chair frame.

8) Reuse Old or Cut New Foam

For several decades now foam has replaced traditional stuffing like horsehair in making chairs cushy to sit on. I'm really not a fan of petroleum based products (one of the many reasons I hate polyester), but it's increasingly unavoidable. You can purchase soy foam, but it's only about 20% soy-based with the rest of the mix produced like polyfoam. The healthiest, least toxic chemical-laden option is to use natural latex rubber foam made from the rubber tree. But in terms of cost-effectiveness, reusing your chair's old foam is the winner. Again, if your chair came from a smoker's house or has cat pee on it, look into buying new foam; otherwise reusing the original stuff is the cheapest and greenest option.

Sewing-Arm-Fabric_SM

I reused all my old foam and batting for the Chevron Chair cushion, arms, and inside back. If you purchase new foam, cut it into the same shapes as the old, using an electric turkey carver. Sounds crazy, but it works. Staple it in place, and cover with batting.

Place-Batting-Over-Arms_SM

9) Sewing the Deck Cushion

Sewing the deck cushion is just like making the arm covers. Pin and baste welting to the top and bottom pieces first, then sew in place. Reuse your old zipper, if possible, for the middle piece of the cushion cover. Sew the zipper to the middle piece, then pin and baste the middle piece to the top and bottom of cover. Remember to sandwich the welting between right sides of the cushion cover, this time sewing from the side you haven't done yet. With the cushion foam wrapped in batting, stuff it into the new cushion cover and zip closed. You can sew a simple muslin cover to go over the foam and batting first, and then put that inside the upholstery fabric cover, but that is an extra step you may not want to take. I didn't.

10) The Inside Back

Completing the inside back of the chair is one of the easiest parts to do because it requires no sewing. Place chevron fabric right side up (because you marked which direction that was) over inside back foam and batting, making sure the batting looks smooth. Staple in place at top and bottom first (on the backside of the frame), working from the center to the right and left. Distribute taut fabric evenly. Then draw the fabric through the left side and right side and staple the same way. This was when I noticed where all the change from your pockets disappears to over the years. You can reach your hand pretty far back between the decking fabric and inside back fabric.

Fitting-Arm-Fabric-over-Arms_SM

11) The Outside Back

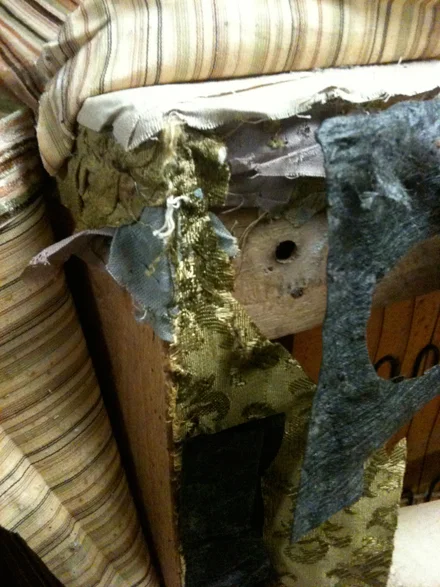
You're almost done! Staple dust cover fabric over the outside back of the chair frame, the same way you did for the outside arms, and place batting over it. Staple the batting in place and fluff it over the staples. Next, take the remaining welting and staple it, raw edges facing inward, around the outside back of the chair. I stapled welting on the top and sides but not the bottom of the chair back because I wanted the bottom of the chair to look the same on all four sides.

How do you staple the outside back cover of the chair, you ask? You don't. This is where you employ flexible metal tacking strip. It's tricky to use and will definitely bite you, but magically works. Staple the metal tacking strip inside the welting, with claws poking outward at you, but in the center of the chair. You're going to bend these claws toward the welting, grabbing the outside back of the upholstery fabric and enclosing the back of the chair. Bend the claws toward welting with your fingers, then pound completely closed with a rubber mallet.

After finagling the flexible metal tacking strip, the only part of chevron left to staple is the bottom. Work from the center to either side of the bottom of the chair frame like you have before.

12) The Dust Cover

¡Finalmente! You're really almost finished! Carefully turning your chair upside down on a clean surface (you don't want to get the fabric dirty), place dust cover fabric over the bottom of the chair. Tuck raw edges in and staple in place to keep critters out.

13) Reattach Chair Legs

Lastly, importantly, reattach your chair legs by screwing them in place through the dust cover fabric. Dust cover fabric is not super strong and easily tears. But that's ok, because you need to have chair legs go through it. Once the legs are secure, turn your chair over, and sit in it. Revel in a job well done.

You can use these instructions as a supplement to a book about upholstery, such as Furniture Upholstery by Sunset Books. I also HIGHLY recommend taking an upholstery class at your local community college. Hands on experience with a teacher at an affordable price + whatever you spend on fabric and tools you'll keep. Happy upholstering!

Guest Tutorial by Shop-Keep (part 1)

Artist Showcase, ProjectsElizabeth Ramos

We love living in such a creative community (as we've said a million times). We learn so much from the makers around us...and sometimes we even get to share their talents and experience with you, our followers. Today, I'm pleased to share with you the talents of Joshua and Mandy Blankenship, creators of Shop-Keep. Shop-Keep is a wonderful jack-of-all-trades in the creative scene. The Blankenships both source and craft all manner of creative goods. Whether it's handmade paper cards or refinished vintage furniture, Shop-Keep is your one stop shop for something unique and wonderful.

Mandy has a particular knack for upholstery projects, and she has graciously shared with us the story of how she turned a frumpy old chair into an updated, reupholstered beauty. This is a long story/tutorial, but Mandy has done a great job simply explaining the involved steps of the reupholstering journey. I've always been fascinated with this process, so it's great to have a detailed step-by-step.

So take it away, Mandy!

The-Chevron-Chair_SM

If you don't like details, maybe reupholstery is not for you. This is not the blog post to tell you how to hot-glue fabric to your dining chairs. I am not that girl. I dream of making things--all kinds of things--and doing it the proper way, the way the professionals do.

When my husband and I starting collecting vintage furniture, we collected more than our fair share of chairs. Often wooden dining chairs, or aluminum Goodform and Steel Case office types; but we couldn't turn down the occasional comfy side chair–envisioning a graphic, modern fabric in place of that dingy corduroy or yucky tweed. Around 30 chairs into our collection, Joshua and I decided it was finally time to sign up for the upholstery class at the local community college. It would cost more than $170 per chair to hire someone to redo them, so we figured it was money well spent even if we decided we hated the process.

The 8 week class turned into 18 weeks, attending extra classes once or twice a week to finish our little preciouses (caveat: we could have finished the chairs in MUCH less than 8 weeks if classes had met more often). Joshua became increasingly frustrated with the detailed parts of the process, but he discovered he's exceptionally adept at tear-down (a tight grip comes in handy). I enjoyed it all but needed some extra help with staple-removing and de-nailing things. We're a good match.

What follows is a rough overview of The Making of The Chevron Chair. Once upon a time it was The Comfortable But Aesthetically Needy Corduroy Chair. To create the Chevron Chair, I made some design decisions like removing the skirt to expose those lovely turned legs. You need basic sewing skills to reupholster furniture. An industrial walking-foot machine and upholstery staple gun with air-compressor are also really necessary. I'm not saying you can't do this on a home sewing machine or with a manual staple gun, but your wits will be tested and your hands will be bruised if you go that route.

SUPPLIES

Claw tool: a forked-end tool used to remove tacks and staples Hammer Pliers Masking tape Rubber mallet (white is best, but you can cover a black one with fabric)/ Curved upholstery needles Straight pins Sewing needle (for basting) Seam ripper Flexible tape measure Yardstick / straightedge Spring twine: also called laidcord, a waxed jute twine used to tie springs together Burlap Fabric shears: sharp scissors used for cutting fabric only Flexible metal tacking strip Cardboard tacking strip Tailor's chalk Dust mask Goggles Leather work gloves Upholstery fabric (common yardage for different chairs) *Foam *Batting Dust cover fabric Cording *Zipper Upholstery weight thread

*Can be reused from old chair upholstery

Study-the-Chair-(on-the-right)_SM

1) Studying the Chair

This is an essential first step to reupholstering any piece of furniture. Most upholstered chairs have an inside back, an outside back, inside arms, outside arms, deck, lip, and some have wings, welting, and cushions. If you can't identify where all these pieces are, you will not end up with a fully reupholstered chair, and that will be sad. Make a simple diagram of your chair labeling each part. Place masking tape on each section of your chair and label appropriately: inside left arm, outside left arm, inside right arm, outside right arm, etc. Label your chair, left and right, as you face it, not as if you were sitting in it. Do not skip this step, or you will be confused later on.

Tear-Down-1_SM
Tear-Down-2_SM

2) Tear-Down

Remove chair legs, and place your chair on a sturdy surface for the duration of the reupholstery project. Our chair stands were about 2 feet high and large enough to hold each person's piece with a few inches to spare on each side. Deconstruct your chair with care and gusto, wearing a mask, goggles, and work gloves. Old dust, splinters, and pet hair fly during this phase. Remove staples and decorative nails completely, but do not rip or cut the old fabric. You need all the old fabric to use as a pattern for the new. Also save the batting and foam under the old fabric if possible. Throw away damaged, bug-infested, or smelly chair innards. A smoker's chair stuffing will always smell like the smoker who nestled in it. Rip all the seams of the old fabric and separate the various pieces. Double-check to make sure each piece is labeled before you rip the seams. Consider using the <a href="http://en.wikipedia.org/wiki/Nasal_irrigation">neti pot</a> after a tear-down session.

Repair-Springs_SM

3) Repair Springs, Webbing, and Frame

Some springs are zig-zaggy and others are classically coiled. Every coil is joined by spring twine to create a firm, bouncy base on which to rest your tush. The BEST chairs, we learned, have eight-way hand-tied coils. Our teacher could not say enough good things about eight-way hand-ties. If there is an upholstery hall-of-fame, I wonder if people reminisce about Sir So-And-So's eight-way hand-ties like legends about Helen of Troy's beauty or the Hanging Gardens of Babylon. I hope so.

Make sure your coils are properly tied together with spring twine, that frayed webbing is replaced with new, and that any defects on the wood frame of your chair have been dealt with. Now is the time to completely remove stubborn staples or hammer in broken ones, yank out unnecessary nails or pound ones that are loosely holding the frame together. Make the frame of your chair completely stable and ready to carry the weight of the most robust visiting relative. Once you've repaired all the essentials, lay burlap over bottom and back springs, tuck raw edges under, and staple in place.

Burlap-Over-Springs_SM

4) DO NOT WASH YOUR NEW UPHOLSTERY FABRIC

Learn from my mistakes. I'm used to sewing quilts and garments, and pre-shrinking fabric is a must when you expect to launder anything regularly. Upholstery fabric, however, comes with a sort of protective coat on top, a sheen to repel moisture or food spills. You can, of course, choose a fabric that's not strictly for upholstery, but even those come off the bolt with a finished look. Just remember, you are not going to launder your chair. You will spot-clean it. If you desperately want to pre-shrink the fabric, for goodness sake check the washing instructions for what you bought. Luckily washing the chevron fabric was no big deal, though completely unnecessary. Washing the turquoise fabric for Joshua's chair was a big mistake, as you can see. Fabric.com has wonderful customer service and sent me new fabric at no cost.

Do-Not-Wash-Your-Fabric-2_SM

5) The Old Upholstery Fabric Is Your Map

Lay out the old fabric on top of the new and use it as a pattern, tracing its shape onto the new fabric with chalk. Make sure that each peace of new fabric you cut faces the same direction, as light will reflect differently on upside-down fabric grain vs. right-side up fabric grain. Decide whether to "railroad" your fabric or leave it vertical, where the straight-of-grain runs vertical (parallel to selvedge edges) and the cross-grain is perpendicular to the straight of grain. Railroading fabric is turning the bolt sideways so that it runs left to right and will shift the motif completely. This works for some patterns and definitely not for others. If you're reupholstering two chairs to match, make note of whether or not you railroad the fabric. You don't want to end up with one vertical plaid and another horizontal plaid. Label each new fabric piece with masking tape to show which direction is up.

The Old Upholstery Fabric Is Your Map_SM

Look at the pattern motif of the new fabric, and plan where the pattern repeats will meet at the seams before you trace with chalk. Seam allowances are included in the old fabric piece after you rip out the seams. Notice if that allowance is 1/4 or 1/2 inch and take that into account when deciding where to place seams. My chevron fabric is made of a series of Vs, and I had to think about how those Vs flowed from section to section (from the lip of the chair to the front boxing of deck cushion to the top of deck cushion, etc.). If they can't match perfectly, at least make it look purposeful. I chose to center the chevrons on the lip of the chair first and planned my way up the chair from that point. The top of the chair arms don't match the inside back perfectly but are positioned in a pleasing way. The sides and back just continue the chevron pattern in a way that makes sense. Cut new fabric along traced chalk lines.

Welting, sometimes called piping on garments or smaller projects, is fabric sewn around a cord and used as decorative edging. The Chevron Chair has welting on the deck cushion, down the arms, and around the back of the chair. Fabric used for welting is often cut on the bias, but for my chair I cut 1 1/2 inch strips vertically down the chevron motif so the welting would look kind of like a candy cane. Measure the length of welting on the old fabric to decide how much you need for the new upholstery, or just measure parts on the frame where you think it would look good. Be generous in your measurements. I used less welting with the new fabric than the chair previously had, but I still needed some extra to sew it all together. Use chalk to trace 1 1/2 inch strips as long as you can on the new fabric, and cut along traced lines.

Batting-Isn't-Just-for-Quilting_SM

6) Batting Isn't Just for Quilting

Batting is commonly thought of as the fluffy, scrumptious layer between the top and bottom of a quilt, but it's a must for upholstery too. Every place your chair will be covered with fabric, it needs to be covered in foam and/or batting. Any upholstery fabric that rubs agains raw wood will tear over time and ruin all your hard work, plus it's not comfy to sit on. Before fitting sewn fabric over top of chair arms, place batting over arm foam and raw edges of wood, staple it in place, and fluff batting over staples. Fluffing the batting makes sure that you won't see any divots in the fabric after you place it on top of the batting. If your batting is smooth, your fabric will lay smoothly; if your batting is lumpy, your fabric will look lumpy.

To be continued...

Quick Christmas DIY Framing

ProjectsElizabeth Ramos

I picked up this screen printed poster from Dapper Ink earlier this week for a steal ($12 for an 11 x 17" print!), but I needed some real inspiration for how to mount and hang it in my living room. I didn't want to do a traditional frame from the hobby store--I have such a hard time finding one that I like, and anything custom costs an arm and a leg. Not to mention, since this is a seasonal print and will be packed away in less than a month, I wanted to showcase it in an unconventional way. So I went on a hunt through the house, and came up with a framing technique all my own. Although I think this mounted poster turned out really great, this method could work for any holiday paraphernalia you pick up this season (photos, greeting cards, etc.)

Screen shot 2012-12-12 at 2.36.41 PM
Screen shot 2012-12-12 at 3.43.01 PM

What you need:

Poster or holiday print 1/4" thick plywood (or foam core board if you're in a pinch) Washi tape Blade or scisors Double sided foam tape Small eye screw (optional) Nail or frame mounting hardware (optional)

How to do it:

1) Start by measuring your poster, photo, or print. You'll be mounting this onto the plywood. Then measure and cut your plywood. Obviously you want your plywood to be larger than the poster, but if you're wondering how much larger, a good rule of thumb is as follows: Make the plywood 3" larger than the print on the top, right, and left  and 3 1/2" larger on the bottom. Now, I'm lucky enough to have a husband with a table saw, so this wasn't an issue. However, if you don't have a friend or family member with a table or skill saw, this is where the foam core comes in handy. Simply cut it to size with a straight edge and blade.

2) Find a festive print or color of washi tape. Have I ever mentioned how much I love washi tape?? I truly use it for everything...packaging, labeling, and now apparently framing too.

Screen shot 2012-12-12 at 2.33.56 PM

3) Line up the washi tape with the horizontal and vertical edges of the plywood. Carefully roll it to the opposite end (it's fragile) and firmly press to smooth. I liked this method because it kept me from sanding and filling any of the rough edges of the plywood. Trim your edges once you've gone all the way around the plywood and are satisfied with the placement.

Screen shot 2012-12-12 at 2.33.39 PM

4) Adhere the double sided foam tape to the four corners of the back of the print and line up on top the plywood. Press firmly. I like the floating look of the foam tape.

5) To mount on the wall, I screwed in a single eye screw into the center of the back of plywood about 2" from the top. Then I hung it from an existing nail on the wall. But this piece has a large enough presence, I could just lean it against the wall on a table or mantle.

So that's that! Super simple and a really festive way to hang a holiday print.

All that Glitters: a special tree for the Holiday Fair!

General Info, ProjectsElizabeth Ramos

Well, do we ever have a surprise for everyone who plans to attend the Holiday Fair! Last night the Indie Craft Parade staff had quite the crafty get together where we made over 60 handmade ornaments. (I'm not sure the glitter will ever come out of the carpet.) And guess what?! They're all going on an adorable 4 foot tree provided by our friends at We Took to the Woods. And we're going to raffle off the entire tree this Saturday at the Holiday Fair!! Check out this sneak peek at our work.

64618_10152307337340010_866720687_n

Pretty cool, huh? We'll have raffle tickets available at the event. And next week we'll even give you DIY instructions for a couple of the ornaments we made, so you can give it a try.

So if you didn't already have enough reason to attend, you can check out our beautiful tree and purchase raffle tickets to win it.

See you Saturday!

String Art Demo from Dapper Ink

Artist Showcase, ProjectsElizabeth Ramos

A few months ago, we shared our love of string art---that is incorporating string into an existing piece, or creating art entirely out of string. So we were pretty excited when our friends at Dapper Ink (a local screen print and design shop here in Greenville) decided to do a new installation that featured string art. Over the past years, Dapper Ink has hosted installations created by local artists. With the addition of letterpress printing to their shop, however, they wanted to do something that showed off their love for all things print, and the Long Live Print plans began. So check out their behind the scenes video. They've proved that string art (though time consuming) can be an accessible form of art. Maybe this will even inspire you to try it yourself.

http://vimeo.com/53853809

If you're interested in making some string art of your own, Jen from Dapper Ink has shared a few tips:

1) Rather than just going at the project with nails and string, have a plan. We actually printed our design on a banner printer, attached it to the plywood and used that to guide our nail holes. The paper is also great because it keeps your wood underneath clean. Our hands got REALLY messy because of the oxidation on the nails. Chances are you might not have access to a banner printer. No problem...as long as you're not doing a huge installation, print outs from home should work fine.

2) Recruit friends to help you put in the nails. It WILL take you longer than you think.

3) Look at string art inspiration online to give you an idea of how you want to wrap your string, that is, how you want the pattern to look. Do you want it to be very uniform? Or is it ok to be messy and random? Either choice can be fine, but it's difficult to change your tactics once you've started to fill in the nails with string.

4) Use one continuous strand of string or yarn for as long as you can to maintain an even look to the design. However, tie off the ends often. If it starts to unravel, you could lose all of your work to your last tie off point.

Upcycling Vintage Crates and Boxes from Maiedae

Artist Showcase, ProjectsElizabeth Ramos

We've had such an incredible response to Emily's DIY Chalkboard Lettering a couple of weeks ago, I couldn't wait to put up a new guest blog post from another talented lady. Today I'm introducing Savannah Wallace from Maiedae--an artistic, fashion, and lifestyle blogger. Two years ago Savannah and her business partner Jenny participated in Indie Craft Parade as jewelry artists, and I've been mesmerized with their work ever since. Besides her work in jewelry, Savannah is also a graphic designer and photographer. I've been pestering Savannah to do a guest blog post, and fortunately, her busy schedule has allowed her to share this adorable tutorial with us. Thank you, Savannah!

** ** ** ** ** ** ** ** ** ** ** ** ** ** ** ** ** ** ** ** ** ** ** ** ** ** ** ** ** ** ** ** ** ** ** ** ** ** **

DIY: UPCYCLING VINTAGE CRATES & BOXES

Hello friends! Savannah from 

Maiedae

 here to share with you a simple DIY and tips on up-cycling your vintage crates and boxes. Last year I spent some treasure hunting time at local antique stores in search for wooden finds. I found old coca-cola crates, small wooden boxes and a few larger crates. I built up my little collection and have found over the past year that they've served for many uses! I used them as display pieces for my handmades at a craft show, stacked them together to make night stands for my husband's and my pallet bed, put plants on them outside and used them for pretty storage. Today's DIY shows how I used simple elements to up-cycle one of my favorite wooden boxes as a "free for all" things box.

SUPPLIES

* Multi-surface paint - I used Martha Stewart's metallic gold paint.

* Stencil or silk screen - I found a great selection of stencil pieces and some beautiful Martha Stewart silk screen letters at Michael's. You can find things like this at your local craft shop.

* Dresser knobs.

STEP BY STEP

1. Using a drill, make holes into your wooden piece for knobs or hooks. Use these to hang your keys, add a little visual interest or hang other treasured items from.

2. Paint the inside of your crate with a color of your choice to give your box/crate dimension and a little pop or color or metallic flair.

3. Stencil a word or pattern on your box to match its use.

IMG_2721small
IMG_2721small
IMG_2722

Just by getting a little creative you can easily up-cycle any of your favorite wooden antiqued pieces and give it a little extra charm! Try using your favorite colors, fun stencil patterns and trying it out in different places in your home. I love that my "things" box can be used for mail, main floor nick-nacks, make-up and bathroom supplies. So many uses and way more attractive than a plastic bin.

Thanks for having me! Stay warm.

-Savannah

DIY Chalkboard Lettering with Emily Jeffords

Artist Showcase, ProjectsElizabeth Ramos

We've said this before, but one of the best things about Indie Craft Parade is getting to know the awesome people in the maker community. These connections can provide new friendships, networking connections, business opportunities, and they always supply creative inspiration. For this guest post, we called in one of the amazing connections we've made---the ever lovely Emily Jeffords

We asked Emily to supply a project for us...and she did something awesome: DIY CHALKBOARD LETTERING. This is an amazing idea. Who doesn't love beautifully hand lettered designs? And now you can do it yourself!

So without further ado, take it away, Emily!

** ** ** ** ** ** ** ** ** ** ** ** ** ** ** ** ** ** ** ** ** ** ** ** ** ** ** ** ** ** ** ** ** ** ** ** ** ** **

Hello!  I’m so happy to be guest blogging for one of my favorite groups, Indie Craft Parade!  I’m sure you have noticed the growing chalkboard lettering craze sweeping America and Europe right now.  It’s pretty awesome.  Well, it’s awesome if you have freakishly amazing handwriting (which I don’t!)  I can barely write an address on an envelope with grace. Sadly, I’m going to have to leave the hand-lettering to the likes of Dana Tanamachi and Molly Jaques.

The good news: those of us who aren’t Dana Tanamachi can still have amazing chalkboards with freakishly amazing typography and precision (we just need a teensy bit of help from the computer….  Shhh.)

Oh, and lefties, you’re in luck.  Because you don’t have to do one bit of writing, you can work from right to left!  You should have seen me working on this baby upside down, sideways, and backwards!

This chalkboard DIY is so stylish, so trendy, and so, so easy.

Things I leaned during this DIY:

1. Chalkboard spray paint is a total joke.  Just use flat black paint and mix in a tiny bit of clear gesso or unsanded tile grout.  I didn’t try the paint can variety.  Maybe it’s amazing? 2. Really, really, really cover the paper with chalk.  It will save you so much time in the long run. 3. You might want to do a few words with larger text…  not going to lie, this took quite a while because my text was so small (and I’m a bit of a perfectionist.) 4. A small paintbrush + water is like a magic eraser.

I hope this inspires you to have fun creating something amazing and original.

DIY Round Up: Handmade Notebooks

ProjectsElizabeth Ramos

Well we haven't done a crafty round up since before the festival, so I'm really excited to share what I'm finding inspiring right now. I've recently been hunting for the perfect notebook. Pads of paper that fall apart just aren't cutting it anymore. I love, love the designs coming out of Rifle Paper Company, but I think I might be good and make one myself...we'll see. I think these notebooks might be right up my alley, maybe yours too. The tutorial for this little journal/notebook from Elle's Studio looks simple enough but still super cute. They used patterned paper and chipboard to create a book that would also make a great album or daily scrapbook.

Screen shot 2012-10-03 at 2.48.43 PM

Magenta and Gold? Yes, please! Whitney of Eat, Sleep, Cuddle used scrapbook paper and gold leaf to make this awesome design.

OLYMPUS DIGITAL CAMERA

Making a stamp from a lino block is a great way to create some one of a kind art as well as a functional piece. Check out the tutorial from A Pair of Pears.

Or, if you want to go super basic and still say, "I made this," then this kit from Curious Doodles could be perfect from you. The embroidery is just awesome, and the book is the perfect size.

DIY Round Up: Pet Accesories

ProjectsElizabeth Ramos

We like to put handmade touches on all aspects our lives. Why shouldn't that apply to our pets as well? Give your pets a little handmade love this weekend, and get crafty with something you know they'll enjoy. Cats and kittens just want a hole to cuddle up and hide in. So why not make it a cute cubby like this one from Eilen Tein. (English knitting pattern at the bottom of the post.)

Always forget to bring the plastic baggies on the walk? Make your pet carry his own. This cute collar pouch tutorial from The B-Line.

Love this adorable dog bed DIY from My So Called Crafty Life.

Love cute treat bins, but don't want to pay the designer price? Tidy Mom managed to make this cute tin for just a couple of bucks. Works for pets of all shapes and sizes.

I really do enjoy having my cat chase me around the house as I drag a string in front of her. I'm looking forward to making something cute for her to catch. Tutorial from Martha Stewart.

My heart really does go out to people (especially kids) who can't have a pet because of allergy or space reasons. So I think this fun make-your-own pet tutorial could be a way to get your kids crafting and to give them a pet of their own. Make your own jellyfish in a bottle from Bhoomplay's Blog.