We love living in such a creative community (as we've said a million times). We learn so much from the makers around us...and sometimes we even get to share their talents and experience with you, our followers. Today, I'm pleased to share with you the talents of Joshua and Mandy Blankenship, creators of Shop-Keep. Shop-Keep is a wonderful jack-of-all-trades in the creative scene. The Blankenships both source and craft all manner of creative goods. Whether it's handmade paper cards or refinished vintage furniture, Shop-Keep is your one stop shop for something unique and wonderful.

Mandy has a particular knack for upholstery projects, and she has graciously shared with us the story of how she turned a frumpy old chair into an updated, reupholstered beauty. This is a long story/tutorial, but Mandy has done a great job simply explaining the involved steps of the reupholstering journey. I've always been fascinated with this process, so it's great to have a detailed step-by-step.
So take it away, Mandy!
If you don't like details, maybe reupholstery is not for you. This is not the blog post to tell you how to hot-glue fabric to your dining chairs. I am not that girl. I dream of making things--all kinds of things--and doing it the proper way, the way the professionals do.
When my husband and I starting collecting vintage furniture, we collected more than our fair share of chairs. Often wooden dining chairs, or aluminum Goodform and Steel Case office types; but we couldn't turn down the occasional comfy side chair–envisioning a graphic, modern fabric in place of that dingy corduroy or yucky tweed. Around 30 chairs into our collection, Joshua and I decided it was finally time to sign up for the upholstery class at the local community college. It would cost more than $170 per chair to hire someone to redo them, so we figured it was money well spent even if we decided we hated the process.
The 8 week class turned into 18 weeks, attending extra classes once or twice a week to finish our little preciouses (caveat: we could have finished the chairs in MUCH less than 8 weeks if classes had met more often). Joshua became increasingly frustrated with the detailed parts of the process, but he discovered he's exceptionally adept at tear-down (a tight grip comes in handy). I enjoyed it all but needed some extra help with staple-removing and de-nailing things. We're a good match.
What follows is a rough overview of The Making of The Chevron Chair. Once upon a time it was The Comfortable But Aesthetically Needy Corduroy Chair. To create the Chevron Chair, I made some design decisions like removing the skirt to expose those lovely turned legs. You need basic sewing skills to reupholster furniture. An industrial walking-foot machine and upholstery staple gun with air-compressor are also really necessary. I'm not saying you can't do this on a home sewing machine or with a manual staple gun, but your wits will be tested and your hands will be bruised if you go that route.
SUPPLIES
Claw tool: a forked-end tool used to remove tacks and staples Hammer Pliers Masking tape Rubber mallet (white is best, but you can cover a black one with fabric)/ Curved upholstery needles Straight pins Sewing needle (for basting) Seam ripper Flexible tape measure Yardstick / straightedge Spring twine: also called laidcord, a waxed jute twine used to tie springs together Burlap Fabric shears: sharp scissors used for cutting fabric only Flexible metal tacking strip Cardboard tacking strip Tailor's chalk Dust mask Goggles Leather work gloves Upholstery fabric (common yardage for different chairs) *Foam *Batting Dust cover fabric Cording *Zipper Upholstery weight thread
*Can be reused from old chair upholstery

1) Studying the Chair
This is an essential first step to reupholstering any piece of furniture. Most upholstered chairs have an inside back, an outside back, inside arms, outside arms, deck, lip, and some have wings, welting, and cushions. If you can't identify where all these pieces are, you will not end up with a fully reupholstered chair, and that will be sad. Make a simple diagram of your chair labeling each part. Place masking tape on each section of your chair and label appropriately: inside left arm, outside left arm, inside right arm, outside right arm, etc. Label your chair, left and right, as you face it, not as if you were sitting in it. Do not skip this step, or you will be confused later on.
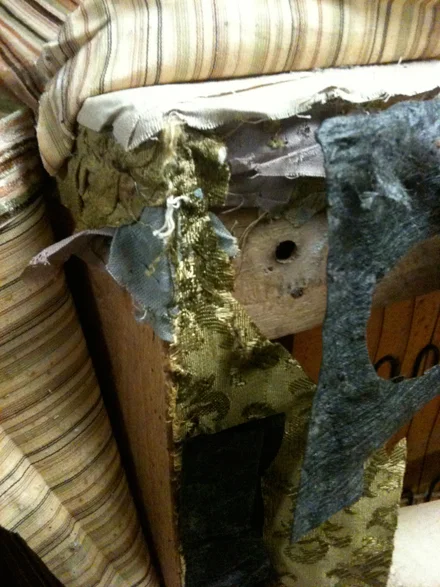

2) Tear-Down
Remove chair legs, and place your chair on a sturdy surface for the duration of the reupholstery project. Our chair stands were about 2 feet high and large enough to hold each person's piece with a few inches to spare on each side. Deconstruct your chair with care and gusto, wearing a mask, goggles, and work gloves. Old dust, splinters, and pet hair fly during this phase. Remove staples and decorative nails completely, but do not rip or cut the old fabric. You need all the old fabric to use as a pattern for the new. Also save the batting and foam under the old fabric if possible. Throw away damaged, bug-infested, or smelly chair innards. A smoker's chair stuffing will always smell like the smoker who nestled in it. Rip all the seams of the old fabric and separate the various pieces. Double-check to make sure each piece is labeled before you rip the seams. Consider using the <a href="http://en.wikipedia.org/wiki/Nasal_irrigation">neti pot</a> after a tear-down session.

3) Repair Springs, Webbing, and Frame
Some springs are zig-zaggy and others are classically coiled. Every coil is joined by spring twine to create a firm, bouncy base on which to rest your tush. The BEST chairs, we learned, have eight-way hand-tied coils. Our teacher could not say enough good things about eight-way hand-ties. If there is an upholstery hall-of-fame, I wonder if people reminisce about Sir So-And-So's eight-way hand-ties like legends about Helen of Troy's beauty or the Hanging Gardens of Babylon. I hope so.
Make sure your coils are properly tied together with spring twine, that frayed webbing is replaced with new, and that any defects on the wood frame of your chair have been dealt with. Now is the time to completely remove stubborn staples or hammer in broken ones, yank out unnecessary nails or pound ones that are loosely holding the frame together. Make the frame of your chair completely stable and ready to carry the weight of the most robust visiting relative. Once you've repaired all the essentials, lay burlap over bottom and back springs, tuck raw edges under, and staple in place.

4) DO NOT WASH YOUR NEW UPHOLSTERY FABRIC
Learn from my mistakes. I'm used to sewing quilts and garments, and pre-shrinking fabric is a must when you expect to launder anything regularly. Upholstery fabric, however, comes with a sort of protective coat on top, a sheen to repel moisture or food spills. You can, of course, choose a fabric that's not strictly for upholstery, but even those come off the bolt with a finished look. Just remember, you are not going to launder your chair. You will spot-clean it. If you desperately want to pre-shrink the fabric, for goodness sake check the washing instructions for what you bought. Luckily washing the chevron fabric was no big deal, though completely unnecessary. Washing the turquoise fabric for Joshua's chair was a big mistake, as you can see. Fabric.com has wonderful customer service and sent me new fabric at no cost.

5) The Old Upholstery Fabric Is Your Map
Lay out the old fabric on top of the new and use it as a pattern, tracing its shape onto the new fabric with chalk. Make sure that each peace of new fabric you cut faces the same direction, as light will reflect differently on upside-down fabric grain vs. right-side up fabric grain. Decide whether to "railroad" your fabric or leave it vertical, where the straight-of-grain runs vertical (parallel to selvedge edges) and the cross-grain is perpendicular to the straight of grain. Railroading fabric is turning the bolt sideways so that it runs left to right and will shift the motif completely. This works for some patterns and definitely not for others. If you're reupholstering two chairs to match, make note of whether or not you railroad the fabric. You don't want to end up with one vertical plaid and another horizontal plaid. Label each new fabric piece with masking tape to show which direction is up.

Look at the pattern motif of the new fabric, and plan where the pattern repeats will meet at the seams before you trace with chalk. Seam allowances are included in the old fabric piece after you rip out the seams. Notice if that allowance is 1/4 or 1/2 inch and take that into account when deciding where to place seams. My chevron fabric is made of a series of Vs, and I had to think about how those Vs flowed from section to section (from the lip of the chair to the front boxing of deck cushion to the top of deck cushion, etc.). If they can't match perfectly, at least make it look purposeful. I chose to center the chevrons on the lip of the chair first and planned my way up the chair from that point. The top of the chair arms don't match the inside back perfectly but are positioned in a pleasing way. The sides and back just continue the chevron pattern in a way that makes sense. Cut new fabric along traced chalk lines.
Welting, sometimes called piping on garments or smaller projects, is fabric sewn around a cord and used as decorative edging. The Chevron Chair has welting on the deck cushion, down the arms, and around the back of the chair. Fabric used for welting is often cut on the bias, but for my chair I cut 1 1/2 inch strips vertically down the chevron motif so the welting would look kind of like a candy cane. Measure the length of welting on the old fabric to decide how much you need for the new upholstery, or just measure parts on the frame where you think it would look good. Be generous in your measurements. I used less welting with the new fabric than the chair previously had, but I still needed some extra to sew it all together. Use chalk to trace 1 1/2 inch strips as long as you can on the new fabric, and cut along traced lines.

6) Batting Isn't Just for Quilting
Batting is commonly thought of as the fluffy, scrumptious layer between the top and bottom of a quilt, but it's a must for upholstery too. Every place your chair will be covered with fabric, it needs to be covered in foam and/or batting. Any upholstery fabric that rubs agains raw wood will tear over time and ruin all your hard work, plus it's not comfy to sit on. Before fitting sewn fabric over top of chair arms, place batting over arm foam and raw edges of wood, staple it in place, and fluff batting over staples. Fluffing the batting makes sure that you won't see any divots in the fabric after you place it on top of the batting. If your batting is smooth, your fabric will lay smoothly; if your batting is lumpy, your fabric will look lumpy.
To be continued...